Customizing a New Queue Manager on IBM MQ for z/OS
Overview
This lab walks through the process of creating a new queue manager using IBM MQ for z/OS 9.4.2 CD (Continuous Delivery). IBM MQ for z/OS is assumed to be already installed in the lab environment, so the product installation itself is out of scope.
Understanding the manual creation process provides useful insight into:
- Architecture: how z/OS queue managers integrate with the operating system
- Performance tuning: the impact of page set and storage configuration
- Troubleshooting: what to check when a queue manager fails to start
- Automation: the foundation for repeatable provisioning and tools such as Ansible
Prerequisites
You will need access to a sandbox z/OS system. If you are not able to access a sandbox z/OS environment, please reach out to IBM Worldwide Systems Center to provision a sample lab environment.
You should be familiar with IBM MQ for z/OS, ISPF/TSO, and SDSF.
The following needs to be installed or configured on z/OS:
- IBM MQ for z/OS. We are using IBM MQ 9.4.5 continuous delivery in this tutorial, but the instructions should work all supported versions of IBM MQ for z/OS.
- REXX EXEC called QMEDIT. The contents of the REXX EXEC are included in this document and may be tailored for different z/OS environments.
Steps
In this lab, you will:
Step 1. Copy and tailor MQ sample JCL
Step 2. Run jobs to create the bootstrap data sets and page sets
Step 3. Add MSTR and CHIN procedures to SYS1.PROCLIB
Step 4. Dynamically add the MQ subsystem to MVS
Step 5. Define subsystem security
Step 6. Start the queue manager and channel initiator
Step 1. Copy and tailor the sample JCL
1. Copy the sample members from the IBM MQ installation library. In this environment, the MQ installation uses the high-level qualifier MQ945CD. You only need the sample members in SCSQPROC. From ISPF option 3.3, copy all members from:
MQ945CD.SCSQPROC(*)
Option ===> C
2. Use ZQSX as the high-level qualifier for the new queue manager library so the copied library becomes ZQSX.SCSQPROC.
3. Type 1 next to option 1 so the new data set is allocated using the attributes of MQ945CD.SCSQPROC, then press Enter.
4. Confirm that the members were copied successfully. You should see a message indicating that 113 members were copied into ZQSX.SCSQPROC.
5. From the ISPF main screen, enter =3.4 on the command line and navigate to the newly created data set.
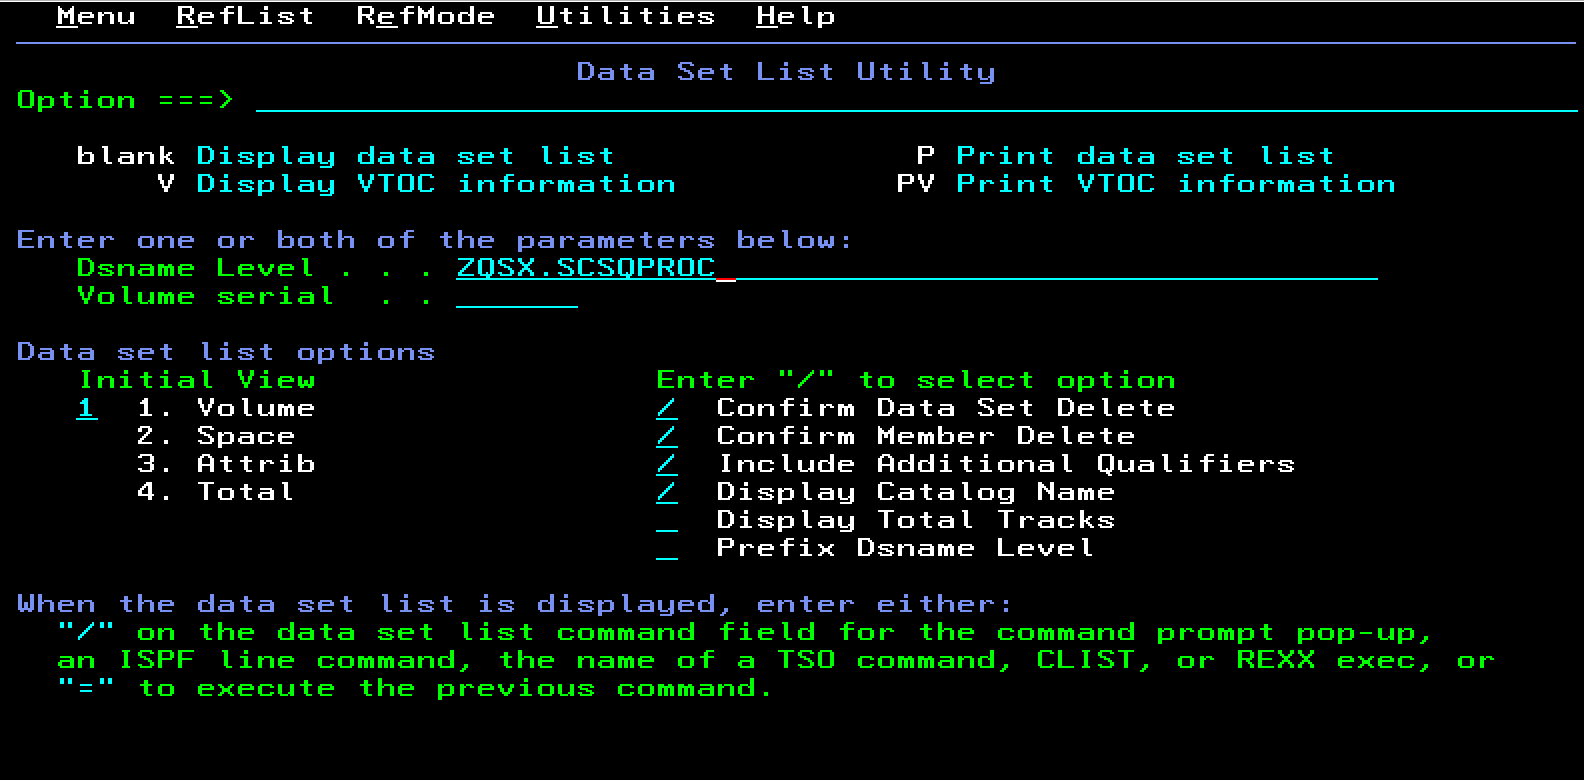
6. Press Enter, then browse the library by entering B next to the data set name.
7. The following members must be customized to create a basic queue manager:
| JCL member | Description |
|---|---|
CSQ4BSDS |
Creates bootstrap data sets |
CSQ4CHIN |
Sample channel initiator procedure |
CSQ4MSTR |
Sample queue manager procedure |
CSQ4INPX |
Sample channel initiator commands |
CSQ4INYG |
Commands to define commonly required objects |
CSQ4PAGE |
Creates page sets |
CSQ4ZPRM |
Creates queue manager initiation attributes |
8. Locate QMEDIT in another queue manager ZQS2.SCSQPROC. From the ISPF main menu, go to option 3.3 and copy:
ZQS2.SCSQPROC(QMEDIT)toZQSX.SCSQPROC(QMEDIT)
NOTE: If you would like to manually customize the necessary MQ JCL, you do not have to use QMEDIT.
9. Review the REXX EXEC to understand what it customizes. Because it was last used for another queue manager ZQS2, you will see ZQS2 and older installation values throughout the member.
The REXX EXEC allows you to make repeated substitutions across the sample members. For example:
ISREDIT MACRO NOPROCESS
ADDRESS ISREDIT
/* **** UNIVERSAL CHANGES ****  */
/* **** HIGH LEVEL QUALIFIER FOR THE WMQ LIBRARIES ****  */
"change '++THLQUAL++' 'MQ933CD' all"
/* **** LANGUAGE LETTER ****  */
"change '++LANGLETTER++' 'E' all"
/* **** HIGH LEVEL QUALIFIER FOR THE BSDS, LOGS, AND ****  */
/* **** PAGE SETS                                    ****  */
"change '++HLQ++' 'ZQS2' all"
/* **** CSQ4BSDS CHANGES ****  */
"change '++BSDSNAME++' 'MY.BSDS.DS' all"
"change '++VOLBSDS1++' 'V1BSDS' all"
"change '++VOLBSDS2++' 'V2BSDS' all"
"change '++VOLLOG1A++' 'V1LOGA' all"
"change '++VOLLOG1B++' 'V1LOGB' all"
"change '++VOLLOG2A++' 'V1LOGC' all"
"change '++VOLLOG2B++' 'V1LOGD' all"
/* **** CSQ4CHIN CHANGES ****  */
"change '++LEQUAL++' 'CEE' all"
"change '++SSLQUAL++' 'SYS1' all"
"change '++OUTCLASS++' '*' all"
"change '++EXITLIB++' 'MY.EXITS' all"
/* **** CSQ4INPX CHANGES ****  */
"change '++port-number++' '1424' all"
"change '++LOCALluname++' 'LUNAME' all"
"change '++channel-name++' 'TEST.CHANNEL' all"
/* **** CSQ4INYG CHANGES ****  */
"change '++qmgr++'  'QMGR' all"
/* **** CSQ4MSTR CHANGES ****  */
"change '++OUTCLASS++' '*' all"
"change '++EXITLIB++' 'MY.EXITS' all"
"change '++LEQUAL++' 'CEE' all"
"change '++DB2QUAL++' 'DB2V13' all"
/* **** CSQ4PAGE CHANGES ****  */
"change '++VOL0++' 'STORAGE' all"
"change '++VOL1++' 'STORAGE' all"
"change '++VOL2++' 'STORAGE' all"
"change '++VOL3++' 'STORAGE' all"
"change '++VOL4++' 'STORAGE' all"
/* **** CSQ4ZPRM CHANGES ****  */
"change '++NAME++'      'QMGRZPRM' all"
Update the values in QMEDIT by issuing these ISPF change commands:
a. Replace the existing queue manager qualifier:
C 'ZQS2' 'ZQSX' ALL
b. Replace the MQ installation high-level qualifier:
C 'MQ933CD' 'MQ945CD' ALL
c. Change the listener port to avoid conflict with ZQS2:
C '1424' '1425' ALL
10. These updates tailor the REXX EXEC for this z/OS environment by setting the correct installation qualifier, queue manager name, and listener port.
11. To activate QMEDIT, press F3, return to the ISPF main menu, select option 6, and enter:
ALTLIB ACTIVATE APPLICATION(EXEC) DA('ZQSX.SCSQPROC')
12. Press Enter. ALTLIB activates the REXX EXEC library so that QMEDIT can be run against the members you need to customize.
13. Return to ZQSX.SCSQPROC through ISPF option 3.4.
14. Starting with CSQ4BSDS, edit each of the following members and run QMEDIT from the command line inside the member:
CSQ4BSDSCSQ4CHINCSQ4MSTRCSQ4INPXCSQ4INYGCSQ4PAGECSQ4ZPRM
15. After you run QMEDIT in CSQ4BSDS, browse through the JCL using F7 and F8 to confirm the changes, then press F3 to save and return to the member list.
NOTE: You must execute
QMEDITin the same session in which you ran theALTLIBcommand. Otherwise, you will receive the messageQMEDIT not found.
16. Repeat the same process for the remaining members.
17. Make an additional customization to CSQ4PAGE. Edit the member and issue the following commands:
C 'VOL=SER' 'STORCLAS' ALL
C 'VOLUMES' 'STORCLAS' ALL
This changes the sample JCL from explicit volume usage to system-managed storage, which is the preferred approach in this environment.
18. Save CSQ4PAGE with F3.
19. Comment out lines 85 by placing * in the first column so they look like this:
000085 //* DD DSN=++HLQ++.USERAUTH,DISP=SHR
NOTE: Only do this in a lab environment. USERAUTH works with z/OS security manager to validate credentials against security profiles in MQQUEUE, MQPROC, and MQCONN classes, providing the first line of defense for queue manager security.
20. Edit CSQ4CHIN, then enter F USER EXIT LIBRARY on the command line to locate the user exit library definitions.
21. Comment out lines 94 and 119 by placing * in the first column so they look like this:
000094 //* DD DSN=++CSFQUAL++.SCSSFMOD0,DISP=SHR
000119 //* CSQXLIB DD DSN=++EXITLIB++.DISP=SHR
22. Press F3 to save CSQ4CHIN and return to the member list.
23. Optionally, use SORT CHANGED from the member list panel to confirm which members were updated.
Step 2. Run jobs to create the bootstrap data sets and page sets
24. Submit CSQ4BSDS. This creates the bootstrap data sets for the new queue manager.
25. Submit CSQ4PAGE. This creates the page sets for the queue manager.
26. Submit CSQ4ZPRM. This creates the queue manager initiation attributes.
27. Return to the ISPF main menu and use option 3.4 to view all ZQSX libraries.
28. Confirm that the new bootstrap and page set data sets now exist alongside ZQSX.SCSQPROC. If they do not, review the job output and compare your JCL with a known working queue manager such as ZQS1.
Step 3. Add MSTR and CHIN to SYS1.PROCLIB, the started task library
29. Navigate to SYS1.PROCLIB using ISPF option 3.4. You need two members for ZQSX: ZQSXMSTR and ZQSXCHIN.
30. From the ISPF main menu, go to option 3.3 and copy:
ZQSX.SCSQPROC(CSQ4MSTR)toSYS1.PROCLIB(ZQSXMSTR)ZQSX.SCSQPROC(CSQ4CHIN)toSYS1.PROCLIB(ZQSXCHIN)
31. Return to SYS1.PROCLIB and verify that both ZQSXMSTR and ZQSXCHIN exist.
Step 4. Dynamically add MQ subsystem to MVS
32. Open SDSF by entering D on the ISPF command line. In SDSF, enter a slash (/) in the command input area and press Enter.

33. Dynamically define the MQ subsystem:
SETSSI ADD,S=ZQSX,I=CSQ3INI,P='CSQ3EPX,ZQSX,S'
NOTE: This dynamic definition does not survive an IPL. To make it permanent, you must update the appropriate
LPALST##,IEFSSN##, andPROG##members inSYS1.PARMLIB.
Step 5. Define subsystem security
34. Return to the ISPF main menu, select option 6, and use the TSO command line to enter:
RDEFINE MQADMIN ZQSX.NO.SUBSYS.SECURITY
NOTE: Never disable subsystem security outside of a controlled lab or workshop environment.
35. In this environment, the definition may already exist. The purpose of this step is to show how subsystem security was configured for the lab.
Step 6. Start the queue manager and channel initiator
36. Return to SDSF and enter the following commands from the MVS command line:
a. Start the queue manager:
ZQSX START QMGR
b. Start the channel initiator:
ZQSX START CHINIT
c. Start the listener:
ZQSX START LISTENER TRPTYPE(TCP) PORT(1425)
37. To verify that the queue manager is working, check in SDSF that ZQSXMSTR and ZQSXCHIN are actively running in address spaces. Alternatively, connect to the queue manager using MQ Explorer or the MQ Web Console.
38. Congratulations. You have created a queue manager from scratch!
Appendix
-
The
QMEDITREXX EXEC is not shipped as part of the base IBM MQ product. It is a convenience tool used in this lab to replace the++variable++placeholder values in the sample members. -
If you make a mistake when issuing the dynamic subsystem command, you can roll it back with:
SETSSI DELETE,S=ZQSX,FORCE
- To check APF-authorized libraries, enter
/DISPLAY PROG,APFfrom SDSF and review the system log.
Required APF-authorized libraries include:
MQ945CD.SCSQANLEMQ945CD.SCSQAUTH-
MQ945CD.SCSQMVR1 -
You may see several
LPALST##,PROG##, andIEFSSN##members. Use the members referenced bySYS1.PARMLIB(IEASYS##). You can identify the activeIEASYS##member with:
/D IPLINFO
Example output:
COMMAND INPUT ===>                                            S
RESPONSE=MQS1
IEE254I  09.34.43 IPLINFO DISPLAY 726
 SYSTEM IPLED AT 09.55.40 ON 03/10/2026
 RELEASE z/OS 03.02.00    LICENSE = z/OS
 USED LOADMQ IN SYS0.IPLPARM ON 0A04C
 ARCHLVL = 2   MTLSHARE = N
 VALIDATED BOOT: NO
 SOFTWARE INSTANCE UUID: bbb756c7-a3ea-40c4-b037-79a73b324536
 IEASYM LIST = XX
 IEASYS LIST = (00) (OP)
 IODF DEVICE: ORIGINAL(0A04C) CURRENT(0A04C)
 IPL DEVICE: ORIGINAL(0A472) CURRENT(0A472) VOLUME(Z32RD1)
 VM CPID = z/VM    7.3.0
 VM UUID IS NOT PROVIDED
 VM NAME = MQS1
 VM EXT NAME IS NOT PROVIDED
- To make the subsystem definition permanent, add an entry similar to the following to the active
IEFSSN##member:
SUBSYS SUBNAME(ZQSX) INITRTN(CSQ3INI) INIPARM('CSQ3EPX,ZQSX,S')
- To make APF authorization permanent, add entries similar to the following to the active
PROG##member:
APF ADD DSNAME(MQ945CD.SCSQ****) SMS
- To dynamically APF-authorize the MQ load libraries, use commands such as:
SETPROG APF,ADD,DSNAME=MQ945CD.SCSQANLE,SMS
SETPROG APF,ADD,DSNAME=MQ945CD.SCSQSNLE,SMS
- To dynamically add MQ modules to the LPA, use:
SETPROG LPA,ADD,MODNAME=(CSQ3EPX,CSQ3INI),DSNAME=MQ945CD.SCSQLINK
SETPROG LPA,ADD,MODNAME=(CSQ3ECMX),DSNAME=MQ945CD.SCSQSNLE